
Free Party Planning Checklist: How To Plan Any Party Step By Step

Planning a party and not sure where to start? This post walks you through exactly what to do and when, from setting your budget 8 weeks out to enjoying the day without running around in a panic. Grab the free party planning checklist printable to keep everything in one place as you go.
Whether you’re organizing a birthday party, a baby shower, an anniversary celebration, or just a big gathering of people you love, the planning process is basically the same. The details change. The timeline doesn’t.
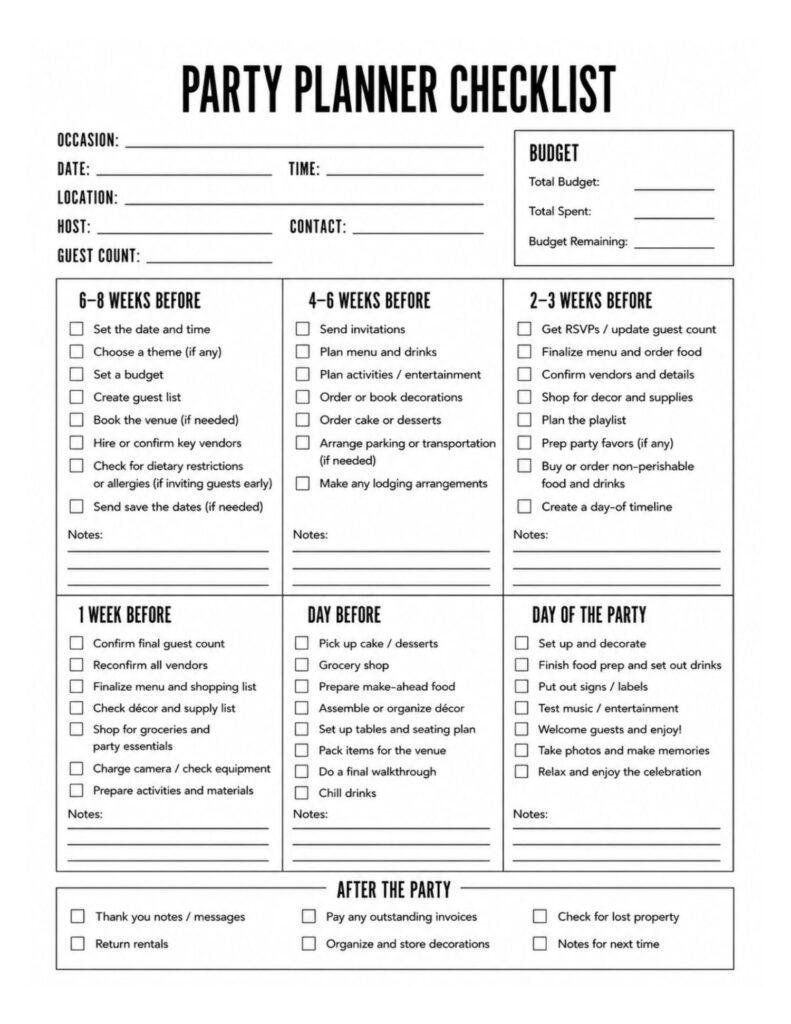
This guide follows that timeline, stage by stage, so nothing gets missed. It covers every stage in this post, with space to fill in your occasion, date, location, budget, and guest count, plus notes sections at each stage so you can keep everything together.
This post may contain affiliate links.Privacy Policy. Follow us on PINTEREST
Download the free printable party planning checklist at the end of this post. Print it out, stick it somewhere visible, and work through it alongside this guide.
Why A Party Planning Timeline Actually Matters
Most party stress comes from doing things in the wrong order or leaving too much to the last week. When you book a venue before you’ve set a budget, or send invitations before you’ve confirmed the date, you create knock-on problems that are avoidable.
A timeline fixes this. It sequences the decisions so each one is made at the right moment, with the right information, and with enough lead time to act on it calmly.
The timeline in this post is built around a party that’s roughly 6-8 weeks away. If you have more time, start earlier and spread the tasks out. If you have less, compress the early stages and focus on the essentials. The order still holds.
6-8 Weeks Before: The Big Decisions
This is the stage most people skip straight through because it feels too early to do anything practical. That’s a mistake. The decisions you make here shape everything else, and some of them have lead times attached.
Set the date and time
Before anything else, land on a date. Check for conflicts: school events, sports seasons, local holidays, other people’s big plans if there’s a guest of honor. Weekend afternoons work for most mixed-age groups. Evening events suit adult-only gatherings. Once you have the date, protect it.
Set a realistic budget
Write down your total number before you spend a dollar. Then roughly divide it across venue, food and drink, decorations, entertainment, invitations, and a buffer for things you didn’t anticipate (there are always things you didn’t anticipate).
The party planning checklist printable has a budget section at the top: total budget, total spent, and budget remaining. Fill in the total now and update it as you go. Seeing the numbers in real time stops the slow creep that derails most party budgets.
Create your guest list
Your guest count drives almost every other decision: venue size, food quantities, seating, budget per head. Get a realistic number early, even if it’s approximate. Note any dietary restrictions or allergies at this stage, especially if you’re inviting guests you don’t know well.
Book the venue (if you need one)
If you’re hosting at home, skip this. If you need an external space, book it now. Good venues fill up fast, especially on weekend dates. Confirm the capacity, the catering policy, any noise restrictions, and what’s included in the hire cost.
Hire or confirm key vendors
If your party needs a photographer, a caterer, a DJ, an entertainer, or any other external supplier, this is when to book them. Don’t leave vendor booking to 4-6 weeks out, particularly for weekend dates in busy seasons. The best people get snapped up early.
Send save the dates if needed
For milestone parties, destination events, or anything where guests need to travel or arrange childcare, send a save the date now. A simple message or digital card is enough at this stage. Full invitations come later.
4-6 Weeks Before: The Plans Take Shape
With the big decisions locked in, this stage is about building out the detail. You’re moving from “we’re having a party” to “here’s exactly what the party looks like.”
Send invitations
Four to six weeks gives guests enough notice to clear their calendars without being so far out that the event slips their minds. Include the date, time, location, dress code if relevant, RSVP deadline, and any key details they need to know (parking, accommodation options, whether kids are invited).
Digital invitations are perfectly fine for most gatherings. Printed invitations are worth the effort for very formal events or when your guest list skews older.
Plan your menu and drinks
Decide on the food format first: sit-down meal, buffet, grazing tables, appetizers only, dessert-focused. Then plan the menu within that format. Account for dietary restrictions you noted on the guest list. Plan your drinks to match the food and the occasion.
If you’re buying alcohol, work out quantities now rather than guessing on the day. A rough guide: allow half a bottle of wine per person for a 2-hour event, scaling up for longer gatherings or a crowd that drinks more freely.
Plan activities and entertainment
Not every party needs a structured activity, but most benefit from at least a loose plan for how the energy will flow. Think about the arc of the event: arrival, main gathering, food, any structured moments (speeches, games, cake), wind-down. If you’re planning party games, decide on them now so you can source any props or materials in good time.
Order decorations and cake or desserts
Custom cakes need lead time, especially from independent bakers. Order yours now with the design brief confirmed. Start pulling together your decoration plan: what you’re making, what you’re buying, and what you already have.
Sort parking and logistics
If guests are traveling, think through the logistics now: parking at or near the venue, public transit options, whether you need to arrange any transportation. If anyone is coming from out of town, flag nearby accommodation options in a follow-up message.
2-3 Weeks Before: Confirm Everything
This is the stage where you tighten everything up. Decisions are mostly made; now you’re confirming them.
Chase RSVPs and finalize your guest count
If your RSVP deadline has passed and you still have gaps, follow up now. A friendly message or text is fine. You need a working head count to finalize food quantities, seating, and anything else that scales with guest numbers.
Finalize the menu and order food
With your guest count confirmed, finalize quantities and place any orders that need lead time: custom items, catering delivery, specialty ingredients. Make a full shopping list now, divided into what you’ll buy in advance and what needs to be fresh.
Confirm all vendors
Touch base with every external supplier to reconfirm the date, time, location, and brief. A quick email is enough. Catching a miscommunication now is much better than discovering it the week of the party.
Shop for decor and supplies
Buy your decorations and party supplies now rather than leaving them to the last week. That way, if something is out of stock or arrives wrong, you have time to source an alternative.
Plan the playlist
Music sets the tone for the whole event. Build your playlist now so it’s not a rushed last-minute job. Think about the arc: something relaxed for arrivals, building energy through the main gathering, a peak around the food and any party moments, then winding back down. If you’re using a DJ or live music, share your preferences with them now.
Prep party favors if you’re doing them
Party favors are entirely optional, but if you’re including them, get them organized now. Assembling them under pressure the day before the party is no fun.
Create a day-of timeline
Write out what needs to happen on the day of the party and when. What time do you need to start decorating? When does the food need to be in the oven? When do vendors arrive? When do guests arrive? A written timeline keeps you calm and on track when the day gets busy.
1 Week Before: The Home Stretch
One week out, the planning is essentially done. This week is about confirming, prepping, and getting ahead of the day-of work so you’re not scrambling.
Confirm final guest count and reconfirm vendors
One more headcount check, and one more vendor touchpoint. At this stage you’re just making sure nothing has changed and everyone is still on the same page.
Finalize the shopping list
Go through your menu and your supply list and build a final shopping list for the week. Divide it into what you can buy now and what needs to wait until closer to the day for freshness.
Check decor and supplies
Go through everything you’ve ordered or bought. Check quantities, check nothing is damaged, check batteries are in anything that needs them. This is a much better time to realize something is missing than the morning of the party.
Prepare activities and materials
If you’re running any games or activities, get everything ready now: print any instruction sheets, gather props, set aside prizes. Having it all bagged and labeled means setup on the day is quick.
Charge camera and check equipment
If you want to take photos, make sure your camera or phone is charged and has enough storage. Check any audio or visual equipment you’re using: speakers, microphones, projectors, lighting.
The Day Before: Set Yourself Up
The day before is for getting as much done as possible so the day itself feels manageable rather than manic.
Pick up the cake and do your grocery shop
Collect anything you’ve ordered and do your fresh grocery run today rather than tomorrow. One less thing to do on the day.
Prepare make-ahead food
Most party food benefits from being made ahead. Dips, salads, marinades, baked goods, anything that holds well in the fridge: make it today. You’ll thank yourself tomorrow.
Assemble or organize decor
Get your decorations out, organized, and where possible pre-assembled. Blow up balloons, prep centrepieces, lay out what goes where. You don’t need to set everything up yet, but having it ready means setup tomorrow takes minutes rather than hours.
Set up tables and seating
If you’re setting up in your own space, do as much of this today as you can. Tables, chairs, linens, placecards if you’re using them.
Pack for the venue (if needed)
If you’re setting up somewhere other than home, pack everything tonight so you’re not hunting for things in the morning. Make a list of what goes in which bag or box.
Do a final walkthrough and chill the drinks
Walk through your checklist one last time. Check everything against your day-of timeline. Get drinks into the fridge or cooler tonight so they’re cold well before guests arrive.
Day Of The Party: Execute And Enjoy
If you’ve followed the timeline, today should feel surprisingly calm. The heavy lifting is done. You’re executing, not scrambling.
Set up and decorate
Work from your day-of timeline. Start with the things that take longest: laying out food stations, setting up entertainment areas, putting up larger decorations. Finishing details like flowers and candles come last.
Finish food prep and set out drinks
Anything that needs to be cooked today, get it in the oven on schedule. Set out drinks and ice with enough lead time that everything is cold before the first guest arrives.
Test music and entertainment
Run through your playlist once. Test the speakers. Make sure any equipment that needs to be connected, charged, or switched on is ready to go before guests walk in the door.
Welcome guests and enjoy
You planned this. Let yourself be present for it. Take photos, talk to people, eat the food. The party is for you too.
After The Party: The Bit Everyone Forgets
The party planning checklist includes an after-the-party section, because closing things out properly saves headaches and means you start fresh for next time.
Send thank you notes
A message, a card, or a text to guests who traveled far, brought gifts, or helped on the day. Do it within a week while the details are still fresh.
Return rentals and pay invoices
Any hired items need to go back. Any outstanding vendor invoices need to be settled. Check your contracts for return deadlines so you don’t incur extra charges.
Organize and store decorations
Anything reusable is worth storing properly. Labeled boxes by occasion or season mean you can actually find things next time rather than buying duplicates.
Check for lost property
A quick scan of the venue or your home before you put everything away. Message guests if anything turns up that isn’t yours.
Notes for next time
The checklist has a space for this and it’s genuinely worth using. What worked? What would you do differently? What took longer than you expected? Notes made now are gold when you’re planning the next one.
Download The Free Party Planning Checklist Printable
If you want all of this in one place, the free party planning checklist printable has every stage covered, with space for your occasion details, a budget tracker, task checklists for each stage, and notes sections throughout. Print it once and use it for every party. Use the form below to get your free copy.
Pin to save:


Hello, I’m Luci, founder of Mums Make Lists. The site is full of useful and fun ideas for life and seasonal celebrations. Plus a growing selection of instantly downloadable fun printables and party planners. Read more.